Automazione per pompa

Buongiorno ho acquistato 2 schede Heltec wifi LoRa32 V3 (V3.2 stampato sulla board)
Sono 2 mesi che cerco di programmare queste schede ma mi da sempre errore e il display non mostra quello che vorrei.
Avrei bisogno di un automazione che in un punto legga il galleggiante di una cisterna e quando ii galleggiante cambia stato mi invii un segnale in un punto distante dove un altra scheda riceva il segnale e attivi una pompa fin quando il galleggiante ritorna al livello alto .
Avrei bisogno che il display del galleggiante mi mostri lo stato del galleggiante e mi mostri anche quando la pompa e’ in funzione, Mentre il display dove c’e’ la pompa mi mostri lo stato del galleggiante e anche quello della pompa ,

Qualcuno mi puo’ aiutare? Grazie

The error message is vital - otherwise we will just be guessing.

compile time error? run time error?
which LoRa library are you using?
have you tested the modules using any of the library example programs?

Diciamo che ho programmato il sistema aiutandomi dell intelligenza artificiale dal momento che non sono molto pratico di programmazione. Devo dire che lo sketch viene caricato ma il display resta spento. Poi ho provato anche a caricare Meshstatic e provato a caricare sopra uno sketch .Ma una volta caricato lo skach iMeshstatic viene rimosso.
Ditemi che informazioni vi devo dare che le posto

if it compiles, links, uploads and runs can you print any serial output, e.g. if there is a problem with a license would display
Please provide a correct license! For more information:
http://www.heltec.cn/search/
ESP32ChipID=XXXXXXXXX

what LoRa library are you using?

Allora ho istallato
“esp32 by Espressif Systems” e clicca su Installa .
Libreria Meshtastic by Meshtastic" e clicca su Installa
Libreria “U8g2 by Oliver Kraus” e clicca su Installa .
Libreria Wire (per I2C): Necessaria per la comunicazione con il display. È già inclusa con Arduino IDE, quindi non devi installarla.

  • Collega una delle tue schede Heltec LoRa 32 V3.2 al computer tramite USB.
  • In Arduino IDE, vai su Strumenti > Scheda > ESP32 Arduino .
  • Cerca e seleziona la tua scheda: Heltec WiFi LoRa 32(V3) .
  • Vai su Strumenti > Porta e seleziona la porta COM/USB a cui è collegata la tua scheda.
    Fase 2: Flash del Firmware Meshtastic su Entrambe le Schede.

Carico questo sketch. (quello del gallegginte)

#include <Meshtastic.h> // Libreria Meshtastic
#include <U8g2lib.h> // Libreria per il display OLED
#include <Wire.h> // Necessaria per I2C (OLED)

// — Configurazione Pin —
const int PIN_GALLEGGIANTE = 2; // Pin GPIO2 per il sensore galleggiante

// — Configurazione Display OLED —
// Per Heltec LoRa 32 V3.2, l’OLED è collegato via I2C sui pin (RST, SCL, SDA).
// RST: GPIO21, SCL: GPIO18, SDA: GPIO19
U8G2_SSD1306_128X64_NONAME_F_HW_I2C u8g2(U8G2_R0, /* reset=/ 21, / clock=/ 18, / data=*/ 19);

// — Variabili per il Galleggiante —
int statoGalleggiante; // Stato attuale del galleggiante (HIGH/LOW)
// Usiamo un debounce per evitare letture “tremolanti” del galleggiante
long lastDebounceTime = 0;
long debounceDelay = 50; // Millisecondi di ritardo per il debounce

// — Funzione di callback per Meshtastic (necessaria, anche se non riceve comandi qui) —
void onReceive(Meshtastic meshtastic, ReceivedData data) {
// Questa scheda invia solo lo stato del galleggiante.
// Puoi aggiungere qui del codice se volessi che anche questa scheda processasse messaggi in entrata.
}

void setup() {
Serial.begin(115200); // Inizializza comunicazione seriale per il debug
Serial.println(“Avvio scheda sensore galleggiante…”);

// Inizializza il display OLED
u8g2.begin();
u8g2.setFont(u8g2_font_ncenB08_tr); // Scegli un font leggibile
u8g2.clearBuffer();
u8g2.drawStr(0, 10, “Avvio Galleggiante…”);
u8g2.sendBuffer();

// Configura il pin del galleggiante come input con pull-up interno.
// Se il tuo galleggiante chiude a massa (0V) quando c’è acqua, allora LOW = acqua.
pinMode(PIN_GALLEGGIANTE, INPUT_PULLUP);
statoGalleggiante = digitalRead(PIN_GALLEGGIANTE); // Leggi lo stato iniziale

// Inizializza Meshtastic. Il firmware Meshtastic deve essere giĂ  flashato.
Meshtastic.begin(onReceive);
Serial.println(“Meshtastic inizializzato.”);
u8g2.clearBuffer();
u8g2.drawStr(0, 10, “Meshtastic OK”);
u8g2.sendBuffer();
delay(1000); // Breve pausa
}

void loop() {
// Meshtastic.update() deve essere chiamata regolarmente per far funzionare la rete.
Meshtastic.update();

int letturaCorrente = digitalRead(PIN_GALLEGGIANTE); // Leggi lo stato del galleggiante

// Debounce: verifica se la lettura è stabile per un certo tempo
if (letturaCorrente != statoGalleggiante) {
lastDebounceTime = millis(); // Riavvia il timer di debounce se il pin è cambiato
}
if ((millis() - lastDebounceTime) > debounceDelay) {
if (letturaCorrente != statoGalleggiante) {
statoGalleggiante = letturaCorrente; // Aggiorna lo stato solo dopo il debounce

  String messaggioStatoAcqua;
  // Adatta questa logica al tuo galleggiante:
  // Se LOW significa che c'è acqua (galleggiante chiuso a massa),
  // e HIGH significa acqua bassa (galleggiante aperto).
  if (statoGalleggiante == LOW) {
    messaggioStatoAcqua = "Acqua OK";
    Serial.println("Livello acqua: OK");
  } else {
    messaggioStatoAcqua = "Acqua BASSA!";
    Serial.println("Livello acqua: BASSO!");
  }

  // Invia il messaggio tramite Meshtastic a tutti i nodi della rete
  Meshtastic.sendText(messaggioStatoAcqua.c_str());
  Serial.print("Messaggio Meshtastic inviato: ");
  Serial.println(messaggioStatoAcqua);

  // Aggiorna il display OLED
  u8g2.clearBuffer();
  u8g2.drawStr(0, 10, "Stato Acqua:");
  u8g2.drawStr(0, 30, messaggioStatoAcqua.c_str());
  u8g2.sendBuffer();
}

}
statoGalleggiante = letturaCorrente; // Aggiorna lo stato per il prossimo ciclo di debounce

delay(500); // Attendi un po’ prima della prossima lettura
}

Lo sketch si carica ma mi cancella il Firmware Meshtastic.
Possono convivere insieme firmaware Meschtastic e codice Arduino?

O devo usare solo uno sketch Arduino senza Meshtastic?

never used Meshtastic Firmware. or libraries

for P2P communication between Heltec LoRa devices I used the SX12XX Library (https://github.com/StuartsProjects/SX12XX-LoRa) and the RadioLib library (https://github.com/jgromes/RadioLib)
used RadioLib library for LoRaWAN

for graphics on the Heltec LoRa V3 I used the HT_SSD1306Wire library (https://github.com/HelTecAutomation/Heltec_ESP32/blob/master/src/HT_SSD1306Wire.h)

AI is pretty useless at programming - it’s setup / tuned for specific activity - IoT isn’t one of them and definitely not Meshtastic which has a rather complex structure and is overkill for point to point messages. AI is OK to answer questions to get information but not to do the actual work yourself.

But if you can’t as a minimum put some print statements in to debug the situation, either learn the very basics of Arduino or use the provided examples that are close to what you want to do or ask a friend to help.

Perche il display della heltec lora 32 V3.2 mi rimane sempre spento?
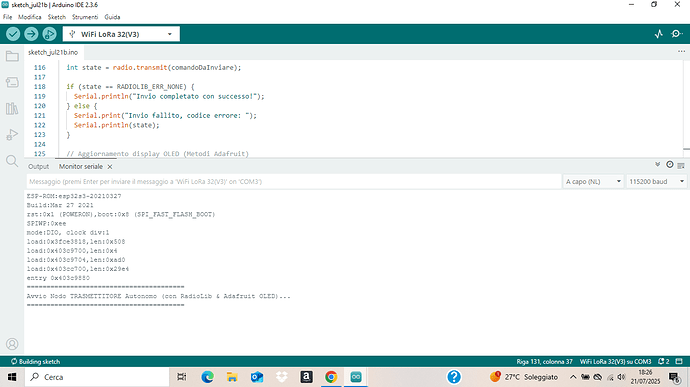
Vi mamdo un output del serial monitor

Bit hard to tell because we don’t know what the program is - where did you get it from?

You need to wind back a long long way in your Arduino journey to be able to make sense of this stuff and to be at a level that we can help you efficiently.

But if you really want to hack your way through, try the factory default sketch.

recommend you download the RadioLib library and run example code from File>Examples>RadioLib>SX126x

e.g. File>Examples>RadioLib>SX126x>SX126x_Transmit_Interrupt - added code to print array contents - you may ned to change the frequency

// Heltec LoRa SX1262 transmit test

// File>Examples>RadioLib>SX126x/SX126x_Transmit_Interrupt

// EDITs:
//  radio.begin frequency set to 868.0
//  transmitting byte array and printing it

/*
  RadioLib SX126x Transmit with Interrupts Example

  This example transmits LoRa packets with one second delays
  between them. Each packet contains up to 256 bytes
  of data, in the form of:
  - Arduino String
  - null-terminated char array (C-string)
  - arbitrary binary data (byte array)

  Other modules from SX126x family can also be used.

  For default module settings, see the wiki page
  https://github.com/jgromes/RadioLib/wiki/Default-configuration#sx126x---lora-modem

  For full API reference, see the GitHub Pages
  https://jgromes.github.io/RadioLib/
*/

// include the library
#include <RadioLib.h>

// Heltec LoRa V3  SX1262 has the following connections:
// NSS pin:   8
// DIO1 pin:  14
// NRST pin:  12
// BUSY pin:  13
SX1262 radio = new Module(8, 14, 12, 13);

// or detect the pinout automatically using RadioBoards
// https://github.com/radiolib-org/RadioBoards
/*
#define RADIO_BOARD_AUTO
#include <RadioBoards.h>
Radio radio = new RadioModule();
*/

// save transmission state between loops
int transmissionState = RADIOLIB_ERR_NONE;

// flag to indicate that a packet was sent
volatile bool transmittedFlag = false;

// this function is called when a complete packet
// is transmitted by the module
// IMPORTANT: this function MUST be 'void' type
//            and MUST NOT have any arguments!
#if defined(ESP8266) || defined(ESP32)
ICACHE_RAM_ATTR
#endif
void setFlag(void) {
  // we sent a packet, set the flag
  transmittedFlag = true;
}

void setup() {
  Serial.begin(115200);
  delay(2000);
  // initialize SX1262 with default settings
  Serial.print(F("\n\nHeltec LoRa V3 [SX1262] Initializing ... "));
  int state = radio.begin(868.0);
  if (state == RADIOLIB_ERR_NONE) {
    Serial.println(F("success!"));
  } else {
    Serial.print(F("failed, code "));
    Serial.println(state);
    while (true) { delay(10); }
  }

  // set the function that will be called
  // when packet transmission is finished
  radio.setPacketSentAction(setFlag);

  // start transmitting the first packet
  Serial.print(F("[SX1262] Sending first packet ... "));

  // you can transmit C-string or Arduino string up to
  // 256 characters long
  transmissionState = radio.startTransmit("Hello World!");

  // you can also transmit byte array up to 256 bytes long
  /*
    byte byteArr[] = {0x01, 0x23, 0x45, 0x67,
                      0x89, 0xAB, 0xCD, 0xEF};
    state = radio.startTransmit(byteArr, 8);
  */
}

// counter to keep track of transmitted packets
int count = 0;

void loop() {
  // check if the previous transmission finished
  if (transmittedFlag) {
    // reset flag
    transmittedFlag = false;

    if (transmissionState == RADIOLIB_ERR_NONE) {
      // packet was successfully sent
      Serial.println(F("transmission finished!"));

      // NOTE: when using interrupt-driven transmit method,
      //       it is not possible to automatically measure
      //       transmission data rate using getDataRate()

    } else {
      Serial.print(F("failed, code "));
      Serial.println(transmissionState);
    }

    // clean up after transmission is finished
    // this will ensure transmitter is disabled,
    // RF switch is powered down etc.
    radio.finishTransmit();

    // wait a second before transmitting again
    delay(1000);

    // send another one
    Serial.print(F("[SX1262] Sending another packet ... "));

    // you can transmit C-string or Arduino string up to
    // 256 characters long
    //String str = "Hello World! #" + String(count++);
    //transmissionState = radio.startTransmit(str);

    // you can also transmit byte array up to 256 bytes long
    static byte byteArr[] = { 0x01, 0x23, 0x45, 0x67,
                              0x89, 0xAB, 0xCD, 0xEF };
    for (int i = 0; i < sizeof(byteArr); i++)
      Serial.printf("%d ", byteArr[i]);
    transmissionState = radio.startTransmit(byteArr, 8);
    byteArr[0]++;
  }
}

File>Examples>RadioLib>SX126x>SX126x_Receive_Interrupt

// Heltec Lora V3 SX1262 _Receive_Interrupt

// File>Examples>RadioLib>SX126x>SX126x_Receive_Interrupt

// EDITs:
//  radio.begin frequency set to 868.0
//  receiving byte array and printing it

/*
  RadioLib SX126x Receive with Interrupts Example

  This example listens for LoRa transmissions and tries to
  receive them. Once a packet is received, an interrupt is
  triggered. To successfully receive data, the following
  settings have to be the same on both transmitter
  and receiver:
  - carrier frequency
  - bandwidth
  - spreading factor
  - coding rate
  - sync word

  Other modules from SX126x family can also be used.

  For default module settings, see the wiki page
  https://github.com/jgromes/RadioLib/wiki/Default-configuration#sx126x---lora-modem

  For full API reference, see the GitHub Pages
  https://jgromes.github.io/RadioLib/
*/

// include the library
#include <RadioLib.h>

// Heltec LoRa V3  SX1262 has the following connections:
// NSS pin:   8
// DIO1 pin:  14
// NRST pin:  12
// BUSY pin:  13
SX1262 radio = new Module(8, 14, 12, 13);

// or detect the pinout automatically using RadioBoards
// https://github.com/radiolib-org/RadioBoards
/*
#define RADIO_BOARD_AUTO
#include <RadioBoards.h>
Radio radio = new RadioModule();
*/

// flag to indicate that a packet was received
volatile bool receivedFlag = false;

// this function is called when a complete packet
// is received by the module
// IMPORTANT: this function MUST be 'void' type
//            and MUST NOT have any arguments!
#if defined(ESP8266) || defined(ESP32)
ICACHE_RAM_ATTR
#endif
void setFlag(void) {
  // we got a packet, set the flag
  receivedFlag = true;
}

void setup() {
  Serial.begin(115200);
  // initialize SX1262 with default settings
  Serial.print(F("\n\nHeltec LoRa V3 [SX1262] Initializing ... "));
  int state = radio.begin(868.0);
  if (state == RADIOLIB_ERR_NONE) {
    Serial.println(F("success!"));
  } else {
    Serial.print(F("failed, code "));
    Serial.println(state);
    while (true) { delay(10); }
  }

  // set the function that will be called
  // when new packet is received
  radio.setPacketReceivedAction(setFlag);

  // start listening for LoRa packets
  Serial.print(F("[SX1262] Starting to listen ... "));
  state = radio.startReceive();
  if (state == RADIOLIB_ERR_NONE) {
    Serial.println(F("success!"));
  } else {
    Serial.print(F("failed, code "));
    Serial.println(state);
    while (true) { delay(10); }
  }

  // if needed, 'listen' mode can be disabled by calling
  // any of the following methods:
  //
  // radio.standby()
  // radio.sleep()
  // radio.transmit();
  // radio.receive();
  // radio.scanChannel();
}

void loop() {
  // check if the flag is set
  if (receivedFlag) {
    // reset flag
    receivedFlag = false;

    // you can read received data as an Arduino String
    // String str;
    // int state = radio.readData(str);

    // you can also read received data as byte array
    byte byteArr[8];
    int numBytes = radio.getPacketLength();
    int state = radio.readData(byteArr, numBytes);

    if (state == RADIOLIB_ERR_NONE) {
      // packet was successfully received
      Serial.println(F("[SX1262] Received packet!"));

      // print string data of the packet
      //Serial.print(F("[SX1262] Data:\t\t"));
      //Serial.println(str);

      // print byte data of the packet
      Serial.print(F("[SX1276] Data:\t\t"));
      //Serial.println(str);
      for (int i = 0; i < numBytes; i++)
        Serial.printf("%d ", byteArr[i]);

      // print RSSI (Received Signal Strength Indicator)
      Serial.print(F("\n[SX1262] RSSI:\t\t"));
      Serial.print(radio.getRSSI());
      Serial.println(F(" dBm"));

      // print SNR (Signal-to-Noise Ratio)
      Serial.print(F("[SX1262] SNR:\t\t"));
      Serial.print(radio.getSNR());
      Serial.println(F(" dB"));

      // print frequency error
      Serial.print(F("[SX1262] Frequency error:\t"));
      Serial.print(radio.getFrequencyError());
      Serial.println(F(" Hz"));

    } else if (state == RADIOLIB_ERR_CRC_MISMATCH) {
      // packet was received, but is malformed
      Serial.println(F("CRC error!"));

    } else {
      // some other error occurred
      Serial.print(F("failed, code "));
      Serial.println(state);
    }
  }
}

transmitter printout (using a HT_62 [SX1262]

HT_62 [SX1262] Initializing ... success!
[SX1262] Sending first packet ... transmission finished!
[SX1262] Sending another packet ... 1 35 69 103 137 171 205 239 transmission finished!
[SX1262] Sending another packet ... 2 35 69 103 137 171 205 239 transmission finished!
[SX1262] Sending another packet ... 3 35 69 103 137 171 205 239 transmission finished!
[SX1262] Sending another packet ... 4 35 69 103 137 171 205 239 transmission finished!
[SX1262] Sending another packet ... 5 35 69 103 137 171 205 239 transmission finished!
[SX1262] Sending another packet ... 6 35 69 103 137 171 205 239 transmission finished!
[SX1262] Sending another packet ... 7 35 69 103 137 171 205 239 transmission finished!
[SX1262] Sending another packet ... 8 35 69 103 137 171 205 239 transmission finished!
[SX1262] Sending another packet ... 9 35 69 103 137 171 205 239 transmission finished!
[SX1262] Sending another packet ... 10 35 69 103 137 171 205 239 transmission finished!
[SX1262] Sending another packet ... 11 35 69 103 137 171 205 239 transmission finished!
[SX1262] Sending another packet ... 12 35 69 103 137 171 205 239 transmission finished!
[SX1262] Sending another packet ... 13 35 69 103 137 171 205 239 transmission finished!

Heltec LoRa V3 receiver printout

Heltec LoRa V3 [SX1262] Initializing ... success!
[SX1262] Starting to listen ... success!
[SX1262] Received packet!
[SX1276] Data:		1 35 69 103 137 171 205 239 
[SX1262] RSSI:		-31.00 dBm
[SX1262] SNR:		11.50 dB
[SX1262] Frequency error:	-831.19 Hz
[SX1262] Received packet!
[SX1276] Data:		2 35 69 103 137 171 205 239 
[SX1262] RSSI:		-32.00 dBm
[SX1262] SNR:		10.50 dB
[SX1262] Frequency error:	-827.31 Hz
[SX1262] Received packet!
[SX1276] Data:		3 35 69 103 137 171 205 239 
[SX1262] RSSI:		-32.00 dBm
[SX1262] SNR:		10.75 dB
[SX1262] Frequency error:	-831.19 Hz
[SX1262] Received packet!
[SX1276] Data:		4 35 69 103 137 171 205 239 
[SX1262] RSSI:		-33.00 dBm
[SX1262] SNR:		10.50 dB
[SX1262] Frequency error:	-831.19 Hz
[SX1262] Received packet!
[SX1276] Data:		5 35 69 103 137 171 205 239 
[SX1262] RSSI:		-33.00 dBm
[SX1262] SNR:		10.75 dB
[SX1262] Frequency error:	-835.06 Hz
[SX1262] Received packet!
[SX1276] Data:		6 35 69 103 137 171 205 239 
[SX1262] RSSI:		-33.00 dBm
[SX1262] SNR:		10.50 dB
[SX1262] Frequency error:	-869.94 Hz
[SX1262] Received packet!
[SX1276] Data:		7 35 69 103 137 171 205 239 
[SX1262] RSSI:		-33.00 dBm
[SX1262] SNR:		10.50 dB
[SX1262] Frequency error:	-835.06 Hz
[SX1262] Received packet!
[SX1276] Data:		8 35 69 103 137 171 205 239 
[SX1262] RSSI:		-33.00 dBm
[SX1262] SNR:		10.50 dB
[SX1262] Frequency error:	-873.81 Hz

the heltec lora 32 v3 is very hard to program. I have been working with chat and grok trying to get two heltec lora’s to talk and send gps data between them. I finally gave up after spending many hours. They work great for meshtastic but the hard wired display is difficult. It is on wire and if you add any i2c devices you have to have them on wire1 other than the devices that are on the meshtastic accepted modules. Easy for those on the meshtastic network. Good luck. I finally just went to esp32 with lora module and its much easier to work with.

not found these problems
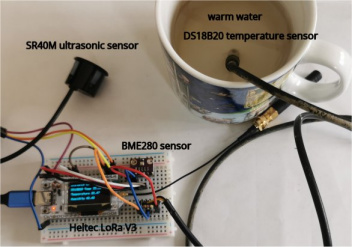
recently used a Heltec LoRa V3 with

  1. BME280 temperature, pressure and humidity sensor connected to I2C using Wire
  2. SR40M ultrasonic sensor
  3. DS20B18 waterproof one-wire sensor

sensor readings were shown on display and transmitted using LoRaWAN to The Things V3 server
image

The violin is very hard to play.

That’s because I’ve never tried starting from the beginning with suitable materials. We also have a piano in the house and LLM (they are not AI) interfaces don’t seem much help - particularly they can’t assess me when I play scales as I don’t have a microphone enabled otherwise they’d hear everything I say. So C hatGPT is pointless as it can’t hear unless it has a microphone and I want it to hear without one.

Amazon sell all sorts of products that I would find hard to use, but that doesn’t mean they are actually hard to use, just that they aren’t in my skill set.

All that said in defence of the mighty and awesome Heltec LoRa v3 that has so many go-to uses but not a great choice for a peer-to-peer pump controller - waste of the ESP32, I guess the display allows you to see what’s happening but that’s overkill when LEDs are a quick status.

However, this stuff isn’t simple, at this level there is no out-the-box experience. Programming requires incremental experience - which means starting small and building up one layer at a time. You don’t go from buying a musical instrument and being able to knock out Ed Sheehan’s latest offering in the space of a few hours. And LLM, which are not AI, have limited value as all they can do is parrot code from the internet.

Meshtastic is also a poor choice - it’s for P2P messaging with some sensor add-ons - so it has a huge code base that is just going to get in the way of remote control of a pump.

I’m pretty sure there will be remote pump units that you can buy, the extra money you pay is for the expertise that makes it a near out the box solution.

Potreste dirmi almeno le giuste librerie da usare e quale core caricare sulle schede. Escluderei anche lo schermo oled usando solo il led integrato come feedback

download the RadioLib library
for P2P try example programs
File>Examples>RadioLib>SX126x>SX126x_Transmit_Interrupt
File>Examples>RadioLib>SX126x>SX126x_Receive_Interrupt

see code and sample output in a previous post

I used IDE V2.3.5 with ESP32 core 3.3.0 RadioLib V7.2.1

1 Like

Is there a water level sensor?

Do you have a relay output?

Once you have the basic P2P working, we can sort out the OLED.

si c’e’ un galleggiante che trasmette su una scheda remota lo stato e nel caso attiva la pompa fino al raggiugimento del livello

ho scaricato la versione IDE 2.3.5 ma quando istallavo il core 3.3.0 mi dava errore (mai successo)

what error?
copy and paste the error message?

before you attempt to transmit your float data etc use simple example test programs to make sure P2P communications work